
Peanut Butter Blossoms Cookies
 Maria J.
8 min read
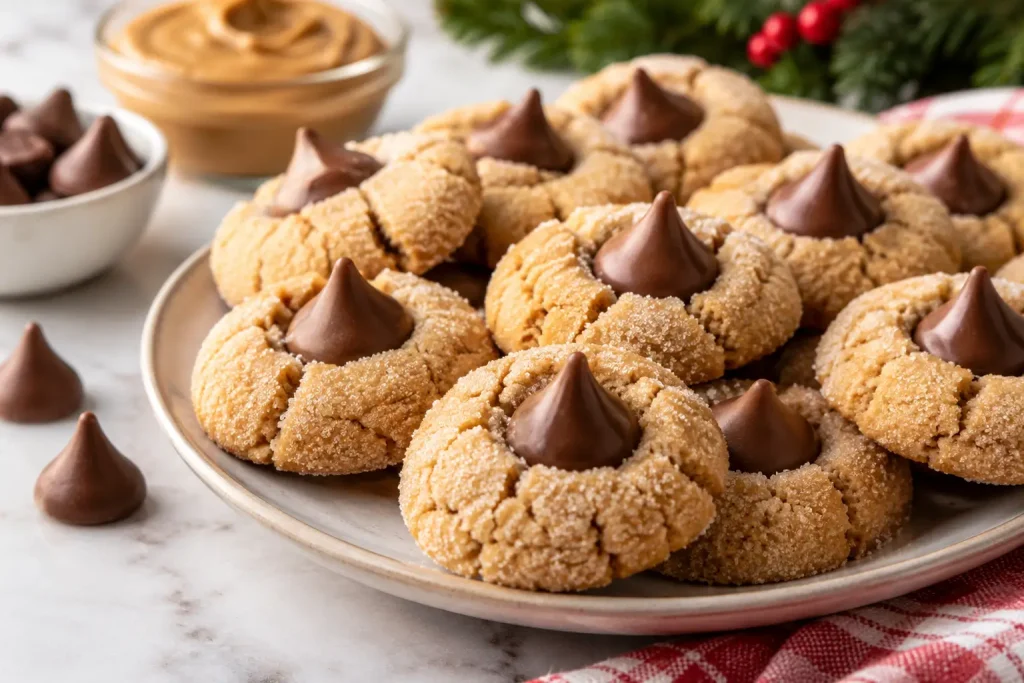
Peanut butter blossoms are classic American cookies made with a soft, chewy peanut butter base and a chocolate candy pressed into the center. Each cookie has a lightly crisp, sugar-coated exterior, a tender middle, and a rich peanut butter flavor that pairs beautifully with milk chocolate. This homemade peanut butter blossoms recipe uses a balanced combination of butter, brown sugar, and creamy peanut butter to keep the cookies flavorful without making them overly sweet. The dough needs a short chill before baking, which helps the cookies hold their shape and develop a satisfying texture. Make a batch for Christmas cookie trays, holiday parties, or whenever you’re craving the familiar combination of peanut butter and chocolate.
Quick Info
- Prep Time: 20 minutes
- Chill Time: 30 minutes
- Cook Time: 10–12 minutes per batch
- Total Time: Approximately 1 hour and 10 minutes
- Yield: 24 cookies
Why You’ll Love This Recipe
- Soft and chewy centers: Brown sugar and creamy peanut butter help create a tender texture.
- Rich peanut butter flavor: Butter, vanilla, and peanut butter give every bite a balanced, nutty taste.
- A classic chocolate topping: A milk chocolate candy adds sweetness and a creamy chocolate finish.
- Easy to prepare: The dough comes together with familiar baking ingredients and basic kitchen equipment.
- Reliable cookie shape: Chilling the dough helps limit spreading and keeps the cookies nicely rounded.
- Great for holiday baking: Their sugar-coated edges and chocolate centers make them a welcome addition to Christmas cookie platters.
Ingredients
- 1 ¼ cups (156 g) all-purpose flour: Provides structure while keeping the cookies tender. Measure by weight when possible.
- ½ teaspoon baking soda: Helps the cookies rise and develop a lightly cracked surface.
- ¼ teaspoon fine salt: Balances the sweetness and brings out the peanut butter flavor.
- ½ cup (113 g) unsalted butter, softened: Adds richness and helps create a tender cookie.
- ½ cup (100 g) packed light brown sugar: Contributes moisture and a soft, chewy texture.
- ¼ cup (50 g) granulated sugar: Sweetens the dough and balances the brown sugar.
- ¾ cup (about 190 g) creamy peanut butter: Use conventional, well-stirred peanut butter for consistent results.
- 1 large egg, at room temperature: Binds the ingredients and helps the cookies hold together.
- 1 teaspoon vanilla extract: Adds warmth and rounds out the flavor.
- ¼ cup (50 g) granulated sugar, for rolling: Coats the dough balls with a delicate sugary crust.
- 24 milk chocolate candy kisses, unwrapped: One for the center of each cookie.
Kitchen Tools
- Stand mixer or hand mixer
- Large and medium mixing bowls
- Whisk and rubber spatula
- Measuring cups and spoons or a kitchen scale
- Baking sheets
- Parchment paper
- Cookie scoop or tablespoon
- Wire cooling rack
How to Make Peanut Butter Blossoms Cookies
1. Prepare the oven and baking sheets
Preheat the oven to 350°F. Line two baking sheets with parchment paper and set them aside. Unwrap the chocolate candies before baking so they’re ready to press into the warm cookies.
2. Combine the dry ingredients
Whisk the flour, baking soda, and salt together in a medium bowl. Breaking up any flour lumps now helps distribute the leavening evenly throughout the dough, so the cookies bake consistently.
3. Cream the butter and sugars
Place the softened butter, brown sugar, and ¼ cup granulated sugar in a large mixing bowl. Beat with a hand mixer or stand mixer until the mixture looks creamy and well combined, about 2 minutes.
Avoid using melted butter. Softened butter should give slightly when pressed but still hold its shape. If the butter is greasy or nearly liquid, the cookies may spread more than expected.
4. Add the peanut butter, egg, and vanilla
Mix in the peanut butter until evenly incorporated. Add the egg and vanilla extract, then beat until the mixture looks smooth. Scrape down the sides and bottom of the bowl to catch any butter or peanut butter that hasn’t mixed in.
5. Finish the dough and chill
Add the flour mixture to the wet ingredients in two additions, mixing on low speed just until no dry flour remains. The dough should be soft enough to scoop but firm enough to roll into balls.
Cover the bowl and refrigerate for 30 minutes. This short rest firms the butter and makes the dough easier to handle, helping the cookies retain their rounded shape in the oven.
6. Shape and coat the cookies
Pour the remaining ¼ cup granulated sugar into a small bowl. Scoop the chilled dough into 24 portions, approximately 1 tablespoon each, and roll them between your palms to form smooth balls.
Roll each ball in sugar until lightly coated. Arrange the dough balls on the prepared baking sheets, leaving about 2 inches between them to allow for spreading.
7. Bake until just set
Bake for 10–12 minutes, rotating the baking sheets if your oven heats unevenly. The cookies are ready when their edges look set, the tops develop small cracks, and the centers still appear slightly soft.
Don’t wait for the cookies to turn dark brown. They will continue to firm up as they cool, and baking them too long can leave the centers dry.
8. Add the chocolate centers
Remove the baking sheets from the oven and immediately press one chocolate candy into the center of each cookie. Press gently until the candy sits securely and the cookie cracks slightly around its base.
Let the cookies rest on the baking sheet for about 5 minutes before transferring them to a wire rack. Allow them to cool completely so the cookie centers can set and the chocolate becomes firm again.
Pro Tips
- Choose the right peanut butter. Conventional creamy peanut butter generally produces more predictable results than natural varieties, which can separate and vary in consistency.
- Measure flour accurately. Too much flour can make the cookies dense and dry. If using measuring cups, fluff the flour, spoon it into the cup, and level the top without packing it down.
- Start with properly softened butter. Butter that’s too cold won’t cream evenly, while melted butter can make the dough greasy and increase spreading.
- Don’t skip the chill. Refrigerating the dough for 30 minutes firms the fat and makes portioning easier. If your kitchen is especially warm, chill it a little longer.
- Keep the cookies similar in size. Uniform dough balls help the entire batch bake at roughly the same rate.
- Press the candies in immediately. The cookies are easiest to top while warm. Waiting too long can cause the edges to crack excessively or prevent the candy from sitting securely.
- Watch the final minutes of baking. Peanut butter cookies can become dry quickly when overbaked. Remove them while their centers still look a little soft.
Variations
- Holiday sugar coating: Replace the rolling sugar with red, green, or festive sanding sugar for a colorful Christmas cookie platter.
- Dark chocolate blossoms: Use dark chocolate candies instead of milk chocolate for a less-sweet chocolate finish.
- Peanut butter cup centers: Press a small peanut butter cup into each warm cookie for an extra peanut butter and chocolate combination. Allow the cookies to cool completely before handling.
- Extra vanilla flavor: Replace the vanilla extract with an equal amount of vanilla bean paste if you prefer its appearance and flavor.
Storage & Freezing
Room temperature: Once completely cool, store the cookies in an airtight container at room temperature for up to 5 days. Keep them away from direct sunlight and warm appliances so the chocolate centers remain intact.
Refrigerator: Refrigeration isn’t necessary for properly stored cookies, but you can refrigerate them if your kitchen is warm. Place them in an airtight container and let them come to room temperature before serving for a softer bite.
Freezing baked cookies: Arrange the cooled cookies in a freezer-safe container, separating layers with parchment paper. Freeze for up to 2 months for the best quality. Thaw at room temperature in the container to help prevent condensation from collecting on the chocolate.
Freezing the dough: Shape the dough into balls before rolling them in sugar, then freeze them in a single layer. Once firm, transfer them to a freezer-safe bag or container and freeze for up to 2 months. When ready to bake, thaw the dough in the refrigerator, roll the balls in sugar, and bake as directed. If the dough is still cold and firm, allow a few extra minutes in the oven as needed.
Conclusion
These peanut butter blossoms cookies bring together everything that makes this classic American treat so appealing: a tender, chewy peanut butter cookie, a sparkling sugar coating, and a smooth chocolate center. With accurately measured ingredients, a short chilling period, and careful baking, you can make a batch that holds its shape without sacrificing softness. Serve them at Christmas gatherings, share them with friends, or keep a few in the cookie jar for an afternoon treat.


Comments 0
No comments yet. Tell us how your bake turned out.